We will be talking in this article on how to print SILKSCREEN
PREPARING SCREENS
These instructions explain 4 of the more popular methods used for preparing screens. Read them carefully. Follow them carefully.
. . 1 . PAPER STENCIL METHOD
This is the best method for a beginner It is the fastest, least expensive, and simplest way to prepare a screen. It is done by cutting the message or illustration from paper. Newspaper or newsprint will work satisfactorily. Keep the paper flat and not wrinkled. For more accurate and durable cut paper stencils, use waxed paper. Designs can be cut with scissors or stencil knife or they can be "torn" to create a textured appearance.
Step A
Cut your paper stencil. You may wish to create a design by folding and cutting your paper as illustrated. For your stencil, you can use either the cutout or the paper remaining.
Step B
Position printing paper under the frame.
Lay your cutouts on this paper as desired and lower the screen.
Screen Printing
Fabric Kit #4526 has materials for methods 1, 2, 3 & 4..
Craft Kit #4521 &
Deluxe Kit #4522 have materials for methods 1, 2, & 3.
Step C
Follow the directions found in the section "Making Prints."
Press down on the screen frame to insure complete contact with all cutouts. Make your first print. You will find with the first pass of the squeegee, the ink will cause the cutouts to stick to the underside of the screen creating a stencil effect.
Once you see how simple this method is, you may wish to try variations by creating two or three designs with torn paper of various shapes and printing each in a different color or hue. Do not overlap cutout pieces on the screen.
For intricate cutouts and small pieces, you may use school paste or rubber cement to adhere them to the bottom of the screen. NOTE: Generally ten to fifteen prints can be satisfactorily produced by this method. When a larger number of prints is desired, you should use one of the more "permanent" methods.
. . 2 . SCREEN FILLER METHOD
Direct block-out or "Negative Method"
Using Screen Filler is another simple means of preparing a screen for printing. The Screen Filler is used to block out those areas which you do not wish to print. This allows the ink to be forced through the screen whenever the Screen Filler has not been applied
Step A
On a sheet of plain paper, make up the illustrations or message you wish to print with your screen. Place this layout on a table top. Place your screen over this layout and trace your design directly on the screen fabric with a soft lead pencil.
Step B
Stir the Screen Filler until it is thoroughly mixed to a smooth consistency. Select an appropriate brush. This will be determined according to the type of line or texture to be produced. You can work on either the front or back of the screen. Be certain that bottom of screen is elevated-not touching table. Paint areas of the layout that you do not want to print. When all areas to be blocked out are covered with Screen Filler, flip the screen over and smooth out places the Filler may have collected on the opposite sideof the screen. Be careful during this smoothing out not to distort your work.

Step C
Leave the screen to dry in a level position. Make sure nothing touches the areas covered with Screen Filler Thorough drying is necessary. Overnight drying is recommended to assure best results.Check for pin holes in the blocked-out areas. You can do this by holding the screen up to a light. Fill any pin holes with Screen Filler and allow to dry completely. You are now ready to print. NOTE: Since Screen Filler is applied to all areas which are not to be printed, this-along with all traditional "direct" methods-is considered to be a "negative" method of printing. Your print will be the opposite of that which you created in your screen.
. . 3 . DRAWING FLUID - SCREEN FILLER METHOD
Tusche-resist or " positive!' method
Step A
On a sheet of plain paper, make up the illustrations or message you wish to print with your screen. Place this layout on a table top. Place your screen over this layout, top side up. Trace your design directly on the screen fabric with a soft lead pencil.
Step A-Alternative
The preparation of a layout is to help guide the application of Drawing Fluid. If you feel such a guide is unnecessary, go directly to step B.
Step B
Select an appropriate brush. This will be determined by the type of line or texture to be produced. You can work on either side of the screen. Remember, however, that your printing will be done from the top (or "ink-fill") side of the screen.
Be certain that screen is elevated-not touching table. Paint the Drawing Fluid over those areas of your layout that you want to print. Leave the screen to dry in a level, flat position. Make sure nothing touches the areas covered with Drawing Fluid.
Step C
After the Drawing Fluid is completely dry, open the Screen Filler and mix it thoroughly to a smooth consistency. Spoon it onto the screen fabric on the same side of the screen used for the application of Drawing Fluid.
Use the squeegee or the plastic spreader to apply an evenly smooth coating over the entire screen. One pass should be sufficient. Multiple passes of Screen Filler will dissolve the Drawing Fluid and prevent character washout.
Again, put the screen to dry in a horizontal position making sure nothing touches the fabric. It is important that the Screen Filler dry completely.

Step D
When the Screen Filler has thoroughly dried, spray cold water on both sides of the screen. Concentrate the spray on the areas where Drawing Fluid was applied. These areas will dissolve and the screen will become open at those points so that ink can flow through them.
If some areas remain slightly blocked, scrub them lightly with a small stiff brush on both sides of the screen (an old toothbrush will do a good job). DO NOT USE HOT WATER DURING THIS STAGE. Allow your screen to dry in a level (horizontal) position, bottom-side up.
Drying time may be accelerated by using a hair dryer or fan.

You are now ready to print. Follow the directions found in the section, "Making Prints."
. . 4. PHOTOGRAPHIC EMULSION METHOD
Use polyester or other suitable synthetic fabric or screen material. Do not use silk or organdy if you wish to reclaim the screen.
This is one of the most exciting methods of Screen Printing because it offers the widest range of possibilities. It makes possible the printing of fine line drawings, various hand and commercial lettering techniques, as well as photographic half-tone positives.
All methods of photographic Screen Printing require three things: (1) a screen prepared with a light-sensitive coating, (2) a film positive, or equal, and (3) a light source that will enable you to transfer the opaque images on your positive to the light-sensitive screen you have prepared.Let's examine these requirements.
Step A--Mixing the photo emulsion
SPEEBALL DIAZO SYSTEM:
SB4558 Diazo Kit Follow the mixing instructions given on both containers. Store the sensitized emulsion in a cool and dark place. Shelf life for the sensitized emulsion is 4 weeks at 90 Degrees F 8 weeks at 70 Degrees F and 4 months when refrigerated.
Step B Coating the screen
Coat the screen by first pouring a bead of the solution on one end of the bottom side of the screen. Spread it evenly and thinly with the squeegee or the plastic spreader. Use more solution where necessary. Pour a bead of the solution on one end of the inside of the screen and spread it evenly with the squeegee or the plastic spreader. Work to achieve an even continuous coating on both sides of the screen fabric. Perform the final spreading on the inside of the screen. Return any excess solution to your mixing container.
Step C-Drying the coated screen
In an area AWAY FROM LIGHT AND HEAT, set the screen to dry horizontally, bottom side down. This will provide the most even, flat "film" on the underside of the screen. It will, however, require your elevating the four corners of the underside of the frame during the drying stage with push pins or other suitable devices. An empty drawer, cupboard, closet, or under a cardboard box will work fine. Allow the screen to dry thoroughly. If more than 300 prints are to be run, it is best to apply a second coating of the sensitized Photo Emulsion to the bottom of the screen after the first coat is dry. Remember, work for a smooth, even THIN coating. Repeat the drying process away from heat and light.
Once the sensitized screen is dry, it must remain in a darkened area until it is ready to be exposed. A fan in the dark area will greatly speed up the drying of the emulsion on the screen.
Step D--Preparing a positive
With the SPEEDBALL Bichromate System, the maximum allowable time between application of the sensitized emulsion to the screen and the exposure is 6 hours at room temperature. With the SPEEDBALL Diazo System, the maximum allowable time is eight weeks at room temperature.
A "positive" is any opaque image (usually black), on any transparent or translucent surface. There are many ways you may choose to prepare them.
A excellent transparent film for this purpose is Wet Media Acetate . Wet Media is available in various sizes.
SPEEDBALL Screen Printing Craft Kits include both plain and printed tracing paper. The printed sheets (positives) have copy and illustrations that may be used to create a picture or message. With the plain sheets, you may make art work of your own with Speedball Super Black Ink and an artists' brush or SPEEDBALL pens. Excellent results can also be obtained by using dry transfer or pressure sensitive letters and symbols . These can be applied directly on the tracing paper or clear plastic. The graphics must be opaque to light.
Another way of producing positives is through copy machines that have the capability of reproducing very opaquely on film, tracing paper, etc. In order to satisfactorily produce a positive using a copy machine, the following conditions must be met:
. (1) Black and white line work-Must be opaque.
(2) Photographic print-Must have high contrast.
(3) Copy machine must have capability stated above. You must check this out in advance. Photographic images can also be accurately screen printed.However, because of the half-tones (or continuous tones) which are in all photographs, a special type of "positive" must be prepared. This must be done by someone with photographic expertise and who has the necessary equipment.
Essentially, this person will photographically transfer the halftones to Kodalith Ortho film. A dot patterned half-tone screen will be placed between the lens, and the ortho film. These "half-tone" dots will be exposed to the film simultaneously with the photograph.
The resulting "half-tone" negative will then be converted by the photographer to a "half-tone" positive.
This is the same type of "conversion" that is made in the preparation of photographs for newspaper and magazine printing. The dot pattern breaks up the continuous tones into a half-tone interpretation that can be printed.
Fine art half-tone screen printing involves a posterization process whereby a series of selected positives are produced through a process camera. With filters, the process camera can selectively identify specific colors in the original art. These are then, sequentially prepared for color registry. This is a highly technical procedure and should be attempted only by experienced printers.
For an in-depth treatment of photographic screen procedures, we highly recommend the book, "Screen Printing-Contemporary Methods and Materials" by Frances and Norman Lassiter This book 00 is available at most artists' materials stores.
Step E
Before you remove the sensitized screen from the dark drying area, make sure everything you need to print with is on hand. Set up your exposure lamp as described in step F Copy and illustrations (positives) can be fixed in place with cellophane tape. Do not let two layers of tracing paper overlap. A better alternative than taping the "positives" to the screen fabric is to lay a piece of clear glass, lucite, or plexiglass on top of them. One of these must be used if thin lines or lettering less than 1/4" tall is to be printed. Which ever you use, once you are all "positives" are in place and against the fabric, you are ready to expose the screen.
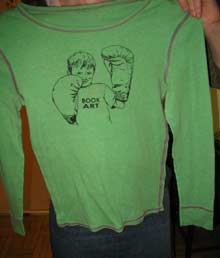
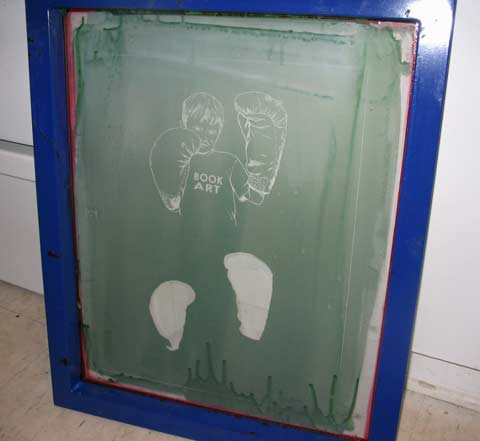
A screen using positives made tracing paper and india ink could now look something like this:


 Step 6:


 I used the photo on the left as a source to produce the drawing on the right, but I liked the red colour of the boxing gloves and wanted to include that in the final print. You can print in any colour you want, but the artwork used to make the stencil must be black. I coloured in the glove shapes, making sure they remained registered correctly to the drawing:
 Every colour you want to print requires a separate stencil.
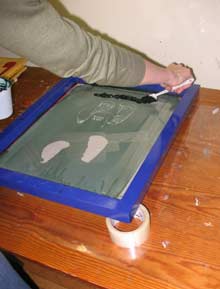
 Emulsion comes in two parts, the emulsion proper and a small bottle of sensitiser. Working by the red light of your own BVM, mix the emulsion with the sensitiser (each brand comes with its own set of instructions on the label). Once sensitised, emulsion is good for about 3 weeks at room temperature, or about 3 months (tops — it gets iffy at the end of those 3 months) if refrigerated. Always wear gloves! when handling emulsion. Those photo-chemicals are nasty!
 Leave the coated screen in the dark to dry for at least 2 hours. Some tutorials say one hour, but I always have bad results with that timeline because the emulsion is not ready. The important thing is that the emulsion is completely dry before you expose your image. No stickiness allowed.

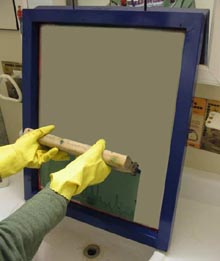
 Fasten the screen into the hinge clamps with the squeegee side facing up and make sure you can move the screen into an upright position in the clamps without it falling back down to the printing surface.


 Ta da!