Home Screenprinting Tutorialby Shannon Gerard
1. Choosing and Preparing Your Screen
What you need:
~ A screen with the right mesh count for your printing surface~ Mr. Clean or any water based degreasing agent
The first thing you need when setting up a home print shop is the screen (I know, weird). Screens with aluminium frames last much longer than wooden frames which warp after repeated washings. Aluminium screens are usually only 10 dollars more than wooden screens of the same size, so even if you plan to use your screen more than one time, the extra money is definitely worthwhile. A sturdy aluminium screen will continue to lie flat on the printing surface after multiple uses and the mesh is pulled much tighter around an aluminium frame which produces a crisper printed image. They’re also a lot easier to wash out than wooden screens.
The other major factor to consider is mesh count. The mesh count refers the tightness of the weave in the mesh fabric of the screen. A higher mesh count means the fibres of the mesh are closer together and a lower count means the fibres are more loosely woven, so more ink can pass through the screen. If you are printing on paper, you want a screen with a mesh count of about 230 for really optimal results. A screen that tight will allow you to print images with finer details and thinner lines. Since fabric is generally more absorbent than paper, you need a screen that lets through more ink when printing on t-shirts, totebags, or anything cloth. For fabric printing, you should use a screen with a mesh count of 110 or 160 (those tend to be the standard counts sold). I use 110. A lot of folks also opt for a mesh count of about 180, which allows printing on both paper and fabric, but there is an obvious loss of fine detail if you print onto paper at that count.
If you live in Toronto, the best place to buy screens and related materials (it’s the cheapest too), is G&S Dye and Accessories at Dundas and University. Dixon, who runs G&S, knows everything about fabric printing (I almost believe he could bring about world peace) and is also very helpful about supplies and advice. His website has very detailed information about printing including some in-depth tutorials and awesome diagrams of home set-ups.
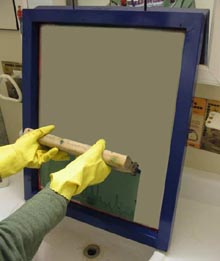
Once you have bought your screen, the first important thing to do is wash it out with cold water and a degreasing agent (I use the unfortunately gender-specific Mr. Clean, the concentration a little bit weaker than what you would put on thefloor). Getting any grease out helps the emulsion to bond with the fabric which gives you a crisper stencil.
Also important is to understand the orientation of your screen (not the gender specific kind). The flat “back” of the screen which sits on the printing surface is called the “print side” or “paper side” and the “front” of the screen, recessed inside the lip of the frame, is called the “squeegee side.”

2. Preparing Your Artwork
What you need:
~ Original artwork with a high contrast~ Transparency film
Screen printing is a very “flat” medium, so images that are starkly contrasted work best. When preparing your artwork to be burned to the screen (to create the stencil), work in black and white only — grey tones and the subtleties of photographic images will not produce a workable stencil. If you start with a photo, as in the example below, reduce the information to a line drawing, or apply a filter or halftone screen in Photoshop which will reduce the image to a series of dots.

 I used the photo on the left as a source to produce the drawing on the right, but I liked the red colour of the boxing gloves and wanted to include that in the final print. You can print in any colour you want, but the artwork used to make the stencil must be black. I coloured in the glove shapes, making sure they remained registered correctly to the drawing:
 Every colour you want to print requires a separate stencil.
Once you have the artwork prepared, print or photocopy it onto transparent film, and you will be ready to produce the screen stencil. It is very important that the black areas printed on the transparency are completely opaque, so hold it up to the light and make sure all the black lines are totally dense.
3. Burning the Stencil
What you need:
~ The screen~ Emulsion and sensitiser~ A scoop coater or squeegee~ Rubber gloves~ A rubber spatula~ A darkroom and photosafe light~ Black bristol board, or black cloth or felt~ Transparencies containing your artwork~ A sheet of glass~ A light fixture with a 250 watt photo flood bulb~ A timer~ A spray bottle full of cold water~ A shower head, spray nozzle or garden hose
This is the most intensive step in the screenprinting process, but if you take a little extra care when making the stencil, the printing process will go super fast.
The first thing to do, after your screen is degreased and completely dry, is to coat the screen in emulsion. Emulsion is the photosensitive goop that will make the stencil on the screen. In areas where the emulsion hardens, the screen is blocked so no ink can pass through. In areas where the emulsion is kept soft and eventually washed out of the screen, the ink will pass through to produce your print. Emulsion is hardened by exposure to light, so you need to conduct this entire process in a darkroom using photosafe lights to see by. I use the extremely ghetto mechanism of a Blessed Virgin Mary (BVM) night light with a red christmas tree bulb inside (witness the shame below) and coat my screens in our windowless bathroom (it gets worse).
 Emulsion comes in two parts, the emulsion proper and a small bottle of sensitiser. Working by the red light of your own BVM, mix the emulsion with the sensitiser (each brand comes with its own set of instructions on the label). Once sensitised, emulsion is good for about 3 weeks at room temperature, or about 3 months (tops — it gets iffy at the end of those 3 months) if refrigerated. Always wear gloves! when handling emulsion. Those photo-chemicals are nasty!
To coat the screen, you can invest in a scoop coater (about 14 bucks) or can use the slightly grosser and less controllable option of a squeegee or wallpaper smoother. A scoop coater is a very easy-to-use trough which holds the emulsion and deposits a nice even, thin coat on the screen. If you’re using the squeegee or smoother option, use a spatula to spread a line of emulsion along one end of the screen (See below) and then, pressing very firmly with the squeegee, drag the line of emulsion down or up the screen until it is evenly coated with emulsion. It is very important to have a thin, even coat of emulsion on the screen, uninterrupted by drips or blobby areas that could mess up the clarity of your stencil. I always double coat my screen by applying one coat to the paper side and another to the squeegee side. You must double coat all in one go while the first coat is still freshly wet.

 Leave the coated screen in the dark to dry for at least 2 hours. Some tutorials say one hour, but I always have bad results with that timeline because the emulsion is not ready. The important thing is that the emulsion is completely dry before you expose your image. No stickiness allowed.
Once the coated screen is dry, you can expose it. It is easy to set up a home exposure unit by arranging materials in this order (from bottom to top)– 1. black cloth or board on the bottom to absorb the light and prevent it from bouncing back through your image area; 2. screen next with paper side down (against the black board); 3. transparencies against the squeegee side of the screen, oriented so that you can read them normally from left to right; 4. a sheet of heavy glass on top of the transparencies to hold them down as tightly as possible to the screen surface; 5. a lamp situated about 1 or 1.5 feet above the glass top with a 250 watt photo flood bulb installed (any good photo store has these for about 8 bucks a bulb).

Don’t forget to set up this exposure unit inside the darkroom! Also, make sure there are no obvious dust particles or other matter in between the transparency and the screen or the glass and the transparency. Any material that blocks the light from getting to the emulsion will show up in your stencil and will interrupt your print.
The other big thing to keep in mind here is that the outer two inches of the screen area (closest to the frame on all sides) are unprintable. Because the tension is so high where the fabric is stretched around the frame, you can’t get a good print out of the border areas of the screen. Make sure your image does not go closer to the frame than 2 inches all around.
Once you have the unit set up in the dark, turn on the flood light for about 15 minutes and allow the emulsion to harden in areas that receive the light.
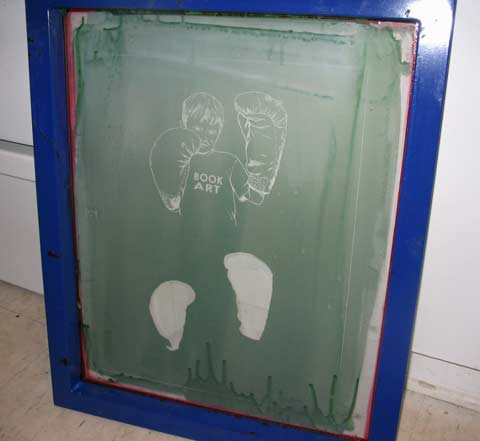
At the end of 15 minutes, you can turn off the flood light and work in the regular light of the room (no more darkroom necessary). Remove the glass and transparency (you will probably be able to see a ghost image of your design at this point, but if you don’t — it’s okay) and immediately, thoroughly spray the entire surface of the screen with cold water. You have to do this right away and wash the screen out before the emulsion gets hard where your design is. Use a spray nozzle in your shower (how convenient that my exposure unit is in the bathroom) or sink, or use the garden hose to spray down the the screen. Gently pass the spray across the whole surface of the screen until your design is completely washed out. Hold it up to the light to make sure no cloudy areas remain inside your stencil. If any pinholes show where you don’t want them, paint them in with left over emulsion and leave them to dry in the sunlight. Now your stencil is done! Let the screen completely dry before printing.
4. Printing the Image
What you need:
~ One set of two hinge clamps
~ A large flat surface~ A big sheet of acetate (at least 2 feet square)~ The finished stencil on the screen~ Packing tape~ A rubber spatula~ Appropriate ink for your printing surface~ The right squeegee for your printing surface~ Whatever you plan to print on (t-shirts or paper)~ A hot iron
To set up for printing, you need a completely flat table or counter top with two hinge clamps installed at the far side and a large piece of acetate or velum (at least 2 feet long — much larger than the paper or fabric you are printing onto). Tape the acetate down firmly at one end so that it will not budge. You need it to be perfectly fixed at one end in order to properly register your print.

 Fasten the screen into the hinge clamps with the squeegee side facing up and make sure you can move the screen into an upright position in the clamps without it falling back down to the printing surface.

Use packing tape to block off any open areas of the screen that you don’t want to print.

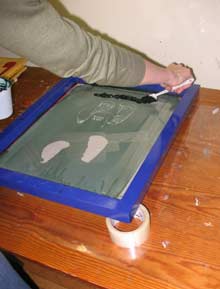
Prop the screen up slightly with your roll of tape and apply a line of ink onto the surface of the screen about 2 inches above the image to be printed. Flood the image with ink using your squeegee. Make sure you have the right kind of squeegee for the material (paper or fabric) on which you are printing. If printing on fabric, make sure you use fabric ink, otherwise your image will wash off in the laundry.

Make sure the acetate is between the printing table and the screen. Lower the screen to the table surface and print the first copy of the image onto the acetate. Immediately flood the image with ink to keep it from drying out. Raise the screen to an upright position in the hinges.

Use the acetate to register your image in the right spot on your shirt or paper by orienting your shirt or paper underneath the acetate.

Remove the acetate (just move it out of the way, don’t detach it from the table!) and lower the screen onto your shirt or paper. Print the image by holding the squeegee at about 45 degrees and applying even, strong pressure to pass the ink through the screen.
 Ta da!
Remember that this ink dries to plastic. Any area, however small, where it dries in the screen will become unusable in the future. In between each print, flood your image. When you’re done printing, wash the screen of all ink right away. Mr. Clean (or any non-gender specific water based cleaning agent) can be used to wash out ink (if necessary) without degrading the emulsion.
Screen ink dries very quickly, so if you are printing in many layers on paper, you can print the second layer on top of the first within about 20 minutes (I wait longer just to make sure no colours bleed together, but you can do it in 20 no problem). If you are printing on fabric, let the image dry for at least an hour (I wait 2) and then iron over top of the image on the hottest setting for at least 1 full minute. Ironing the ink makes it colour fast in the wash.
Easy huh?
Here’s what the printed shirt looks like, and here’s what the same image looks like, in two layers, on paper: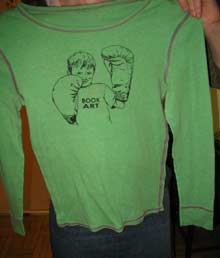

Do you subscribe to any other websites about this? I'm struggling to find other reputable sources like yourself
ReplyDeleteAmela
Screen Printed Shirts